Use Smart Modeling
Smart Modeling offers several options to speed up modeling.
The Smart Modeling toolbar provides functionality for the simple and very fast placement of objects. It provides objects that are directly accessible and a search field for finding and placing object symbols that are not listed in the toolbar. Also, you can use the smart object toolbar to create connections to existing objects.
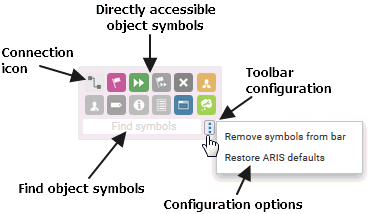
When you place an object using the search field, the symbol of the placed object is added to the list of directly accessible objects for the selected object type.
You can configure the toolbar for each object type so that you always have access to the objects you want to connect.
You can enable or disable Smart Modeling that provides automatic modeling features, such as creating a space for new objects, placing objects, and reconnecting connections.
In an open model, activate the Model tab bar.
Click
 Modeling area.
Enable
 Smart Modeling or disable
  Smart Modeling.
You have enabled or disabled Smart Modeling.
You can configure which symbol type to use per model type in the Smart Modeling toolbar to provide direct access to the objects you want to connect with that object type.
The object symbols you place using the search field are automatically added to the Smart Modeling toolbar of the corresponding object symbol for later use.
In an open model, select an object symbol of an object of the type you want to configure. The
 Insert icons are displayed.
Click one of the
Insert icons. The Smart Modeling toolbar opens.In the Smart Modeling toolbar, click Configure.
To remove individual object symbols, click Remove symbols from toolbar.
They are grayed and their
 remove icons are highlighted.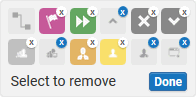
If you want to exclude an already selected object symbol from the removal list, click it again.
To complete the removal, click Done. The selected objects symbols are removed.
To reset direct access to object symbols of the bar to the default setting, click Configure and Restore ARIS defaults. The Smart Modeling toolbar provides the object symbols for direct access that are default set by ARIS.
You have configured the Smart Modeling toolbar.
Thereby, the layout of the current model is changed, but you can undo the change. Changing the default distance affects future layout operations.
In an open model, activate the Model tab bar.
Click
 Layout. The layout options are displayed.
Enter values for Horizontal item spacing and Vertical item spacing.
Keep the Use as default check box enabled.
Click OK. The layout options are applied.
Check whether the new layout meets your requirements. If not, click
 Undo. The layout operation is undone and the model looks as before.
The item spacing you entered is set as the default distance for objects you place using Smart Modeling.
The default distance you set here is also valid for Guided Modeling.
If you have enabled Smart Modeling, the insert icons are displayed under the following conditions.
Enough space
There must be enough space to arrange Insert icons around an object symbol. Therefore, the model display must be large enough to display Insert icons in the model in addition to the objects.
Thus, Insert icons are displayed when Smart Modeling is enabled and the model display is equal or greater than 30 %.
Permission to use a connection
The user must have the privilege to use the outgoing connection of the selected object. If a user does not have the privilege because the used filter does not allow the connection, the Insert icon for the corresponding direction is not displayed.
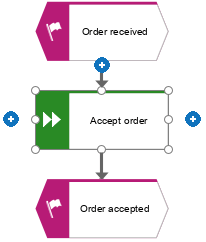
Objects placed with Smart Modeling are placed according to the set default distance. If you want to place a smart object in a specific position, you can place it via drag and drop in the modeling area.
Open the model.
Select the object that you want to connect to a new object. The
Insert icons are displayed.Click the
Insert icon on the side of the selected object to which you want to attach the connection. The Smart Modeling toolbar opens.Click the object symbol you want to place and hold down the mouse button.
Move the mouse pointer to the desired position in the modeling area and click again to place the object. If you have enabled Guided Modeling, lines and arrows inform you of the orientation and distance of the dragged object from adjacent items.
Release the mouse button. The object is placed, and its name is selected for overwriting.
Enter a name. If you enter an existing name, existing objects are offered for selection. You can create a new object, select an existing one, or create a new one with the same name.
If selectable connections are displayed, click another connection or click in the modeling area to obtain the current connection.
With Smart Modeling, you have placed an object with drag and drop.
Open the model.
Place an object with Smart Modeling. The name of the new object is selected for renaming.
Enter a term. As soon as you have entered two or more letters, all objects in the database that are of the same type as the selected object and whose names contain the entered term are listed.
Click the name of the object you want to place.
With Smart Modeling, you have placed the symbol of an existing object in the modeling area.
In an open model, select the object that is connected to another object. The
Insert icons are displayed.Click the
Insert icon of the direction in which the selected object is connected to the other object.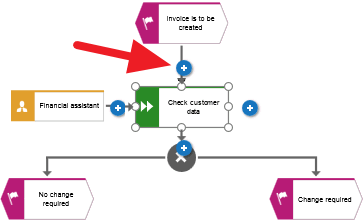
The Smart Modeling toolbar opens.
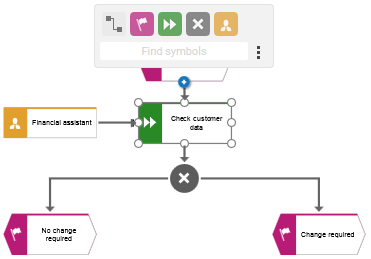
Click the object you want to place between the existing objects. The object is placed between the existing object and new connections are created between the three objects.
Enter a name. If you enter an existing name, existing objects are offered for selection. You can create a new object, select an existing one, or create a new one with the same name.
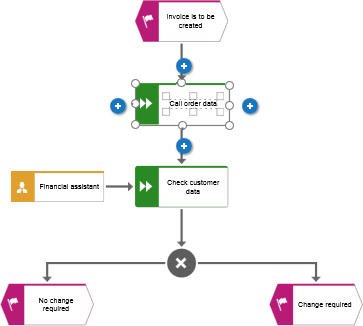
With Smart Modeling, you have quickly placed an object between existing objects.
With Smart Modeling, you can easily place multiple satellite objects. The following example shows how to place multiple satellite objects for an object of type Function.
Open the model.
Select the object you want to connect with multiple satellite objects. The
Insert icons are displayed.Click the
Insert icon of the direction in which you want to place the object. The Smart Modeling toolbar opens.Click the object symbol shown on the Smart Modeling toolbar you want to place, for example, Role. The object is inserted in the direction you selected the
Insert icon and a connection is created to the previously selected object. The name of the new object is selected for renaming.Enter a name. If you enter an existing name, existing objects are offered for selection. You can create a new object, select an existing one, or create a new one with the same name.
Select a connection, for example, is responsible for.
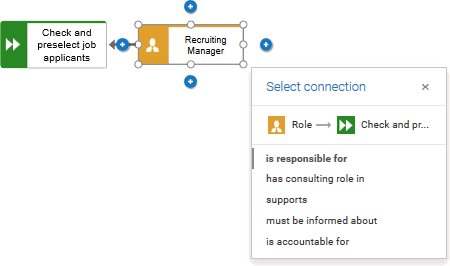
The satellite object is inserted.
Reselect the object you want to connect with multiple satellite objects.
Click the
Insert icon in the same direction in which you placed the previous object and click the Application system type object symbol. The object is placed below the satellite that was placed first.Enter a name. If you enter an existing name, existing objects are offered for selection. You can create a new object, select an existing one, or create a new one with the same name.
Select a connection, for example, supports.
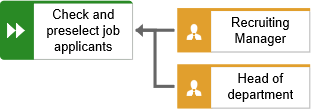
With Smart Modeling, you have placed multiple satellites.
When you use Smart Modeling, some connections are automatically created between the selected and the newly created objects. Objects are also reconnected when you place new objects between existing objects. You can use the Insert icons to connect objects.
Open the model.
Select the object you want to connect with an object that has already been placed. The
Insert icons are displayed.Click the
Insert icon on the side of the selected object to which you want to attach the connection and hold down the mouse button.Move the mouse pointer to the border of the target object.
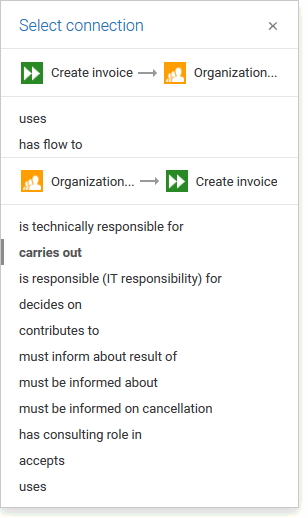
Release the mouse button at the connection anchor point where you want to connect the target object. If you can create more than one connection between the objects, the selectable connections are displayed and the currently used connection is highlighted in bold.
If you want to use another connection, click the corresponding name, otherwise click the modeling area. The connection selection is closed.
You have created a connection using the Insert icon of Smart Modeling.
When you use Smart Modeling, some connections are automatically created between the selected and the newly created objects. Objects are also reconnected when you place new objects between existing objects. You can also connect unconnected objects with the Insert icons and the Smart Modeling toolbar.
Open the model.
Select the object you want to connect with an object that has already been placed. The
Insert icons are displayed.Click the
Insert icon on the side of the selected object to which you want to attach the connection. The Smart Modeling toolbar opens.In the Smart Modeling toolbar, click
 Connection.
Move the mouse pointer to the border of the target object.
Release the mouse button at the connection anchor point where you want to connect the target object. If you can create more than one connection between the objects, the selectable connections are displayed and the currently used connection is highlighted in bold.
If you want to use another connection, click the corresponding name, otherwise click the modeling area. The connection selection is closed.
You have created a connection using the Insert icon of Smart Modeling.
If you place structurally relevant objects, the connection is chosen automatically. If you place satellites, the connections that you can select are displayed. The currently used connection is highlighted in bold.
If you use Del to delete a structurally relevant object that is connected to two structurally relevant objects, Smart Modeling automatically creates a connection between the remaining objects. If you use Shift + Del, Smart Modeling does not create a connection between the remaining objects.
Open the model.
Select the object you want to delete.
If you want the connection between the remaining objects to be created automatically, press Del. The connection is created.
If you do not want the remaining objects to be connected, press Shift + Del. No connection is created.
You have deleted a structurally relevant object so that a connection is automatically created between the remaining objects or no connection is created.